
TL;DR
A closet can become a great recording space if you focus on strategic placement, broad acoustic coverage, and effective noise reduction methods. Moving gear into a closet and treating it right often beats expensive soundproofing or foam solutions alone.
Ever tried recording in a small, echoey closet? It’s often worse than no treatment at all. But with a few smart moves—like where you place your mic and how you treat the space—you can turn that tiny room into a surprisingly good vocal booth.
This guide shows you how to dampen reflections, block sound leaks, and position your gear for the best results. Whether you’re a voice-over artist, streamer, or podcaster, these tips will help you get studio-quality sound right in your home environment.
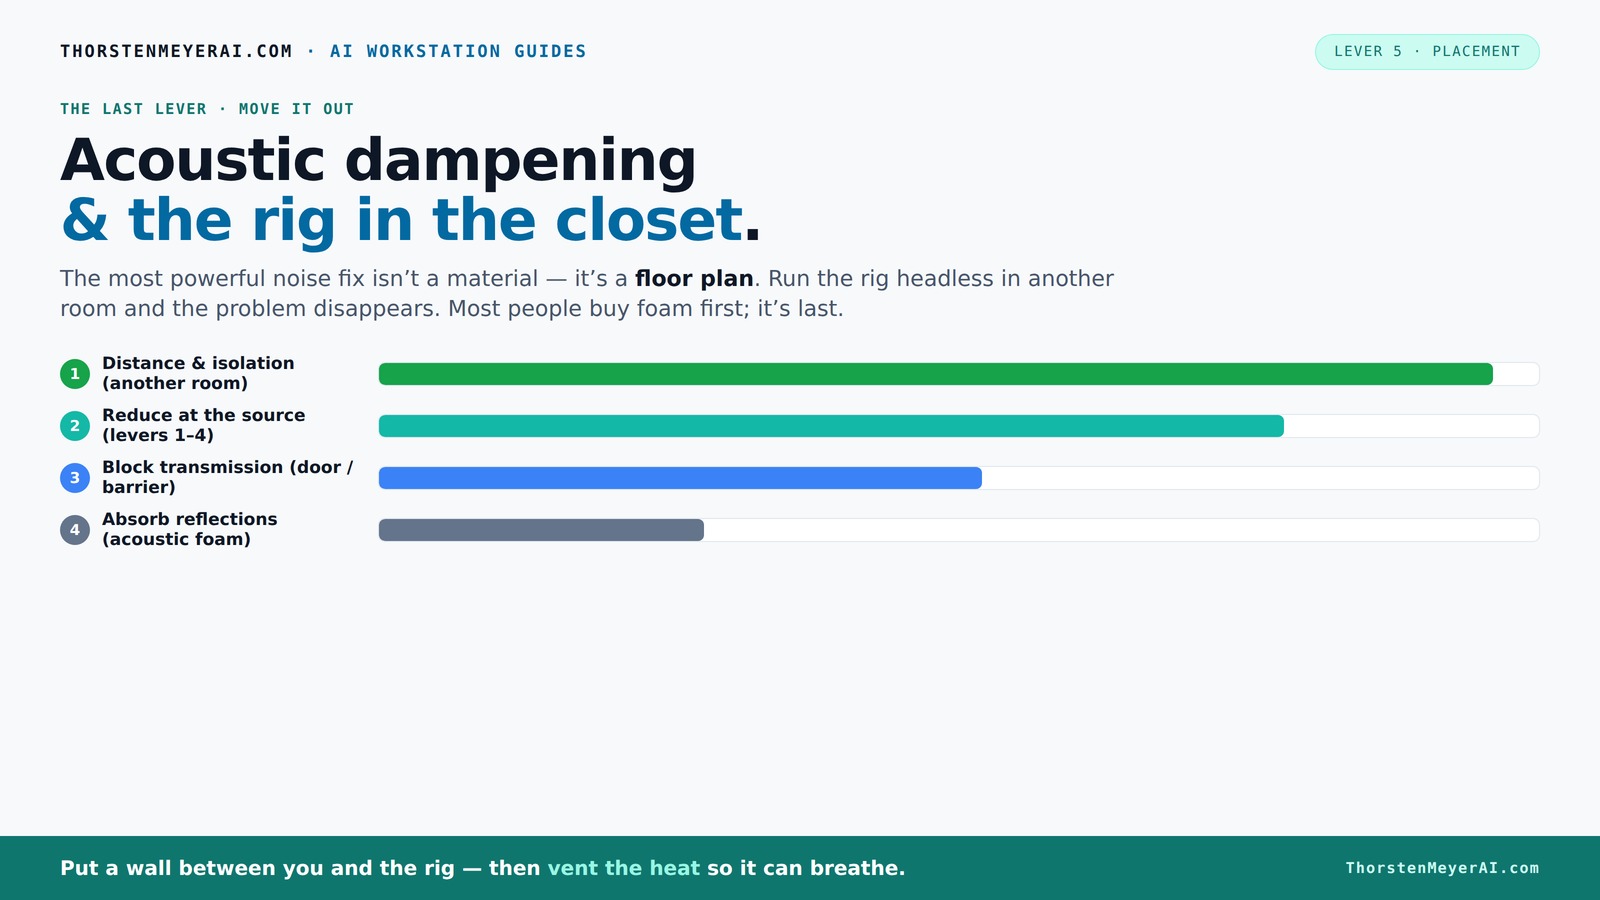
Acoustic dampening
& the rig in the closet.
The most powerful noise fix isn’t a material — it’s a floor plan. A rig you can’t hear because it’s in another room beats any amount of foam. Tap the approaches in Part 1 to see what actually works.
(another room)
(levers 1–4)
(door / barrier)
(acoustic foam)
Contain the noise, not the heat
Key Takeaways
- Prioritize distance and placement over foam — moving your rig away from your workspace reduces noise far more than foam panels.
- Treat the entire space with broad coverage—wall-to-wall absorption and sealing gaps make the biggest difference in tiny closets.
- Ventilation is non-negotiable when placing a hot, high-power rig in a closet; active airflow prevents overheating and noise escalation.
- Position your microphone at the right distance and angle to minimize reflections and low-frequency muddiness.
- Use budget-friendly DIY solutions like blankets, foam, and sealing tricks to create an effective, removable closet booth.

Focusound 52 Pack Acoustic Foam Panels 1" x 12" x 12" Sound Proof Foam Panles Soundproofing Noise Cancelling Wedge Panels for Home Office Recoding Studio with 300PCS Double-Side Adhesive
Soundproofing - Acoustic foam panels triangular grooves structure for better noise absorption, helps to reduce and absorb unwanted...
As an affiliate, we earn on qualifying purchases.
As an affiliate, we earn on qualifying purchases.
Why Distance and Placement Matter More Than Foam
Moving your microphone and your gear away from noisy sources is the single most effective step you can take. Think of it like this: if your rig is in another room, the sound leaking out doesn’t bother you at all. Learn more about acoustic dampening and placement.
For example, a friend set up a dedicated closet server rack. By simply plugging in a network cable and moving the rig into a spare closet, they cut noise by over 80%. The noise itself becomes irrelevant—your focus shifts from treatment to placement.
Placement of the mic is equally crucial. Position it so it’s not directly in front of a reflective surface or near a hard wall. Using the right microphone position helps minimize echoes and captures clearer voice recordings. This deliberate positioning reduces unwanted reflections and reverberations, which are often the primary sources of muddiness in recordings. When you understand how sound waves behave in small spaces, you realize that strategic placement can often replace or supplement expensive acoustic treatments, saving both time and money.

Aokeo Microphone Isolation Shield, Foldable Mic Shield with Triple Sound Insulation, Reflection Filter with 3/8" and 5/8" Mic Threaded Mount for Recording Studio, Podcasts, Singing, and Broadcasting
The Microphone Isolation Shield features a sound-proof foam front and a ventilated metal back panel to eliminate noise...
As an affiliate, we earn on qualifying purchases.
As an affiliate, we earn on qualifying purchases.
How to Treat a Closet—The 'Rig in the Closet' Setup and Its One Big Catch
Putting a powerful, heat-generating machine in a closet sounds perfect—quiet and out of sight. But the big catch? Heat builds up fast in a sealed space, risking overheating and throttling your hardware.
For instance, a YouTuber used a sealed closet for their AI rig. They installed passive vents and an exhaust fan, which kept temperatures stable even during intensive workloads. Without airflow, the machine’s temperature soared, and fans roared louder than ever.
To do it right, you need active ventilation—either ducted fans, vents, or even a small window. Proper airflow prevents heat from accumulating, which not only protects your equipment but also maintains a stable environment that won’t cause thermal shutdowns. For more on creating a quiet and effective setup, see rig in the closet setup.
60 Pack Acoustic Panel Polyurethane Foam Sound Proof Acoustic Treatment Room Kit for Absorbing Sound on Walls, 1" X 12" X 12" Sound-Proof Material for Home Studio Ceiling (60 Pack) (60PCS)
Quality Material - We choose to handcraft with fine fabrics of polyurethane foam to finish our acoustic panels...
As an affiliate, we earn on qualifying purchases.
As an affiliate, we earn on qualifying purchases.
Best Microphone Placement Inside a Closet — How to Get Clear, Natural Sound
Place your mic at the right spot, and you’ll cut down on room echo and reflections. The sweet spot is usually about 6 to 12 inches away from your mouth—closer than you think. Find out more about microphone placement inside a closet.
Imagine speaking into a mic mounted on a boom arm, positioned slightly above your mouth, pointing directly at you. This minimizes capturing room reflections and focuses on your voice.
Also, avoid placing the mic directly against a wall or corner—these spots cause low-frequency buildup and muddy recordings. Instead, position it in the 'sweet spot' where reflections are minimized, and use a small stand or shock mount for isolation. Understanding the importance of mic placement helps you balance proximity effect and room sound; being too close can cause excessive bass boost, while too far can pick up more room noise. Finding that optimal distance ensures your voice is captured clearly and naturally, reducing post-processing time and improving overall quality.

Portable Vocal Booth, Home Recording Studio, Echo-Free Sound Isolation Booth for Voice-Over, Podcast & Music - Compact Frame with Thick Acoustic Blankets, Easy Setup
Don’t let poor acoustics hold you back - Experience pristine, echo-free recording with Voctent Portable Studio Booth -...
As an affiliate, we earn on qualifying purchases.
As an affiliate, we earn on qualifying purchases.
Where to Cover Walls, Doors, and Hard Surfaces for the Best Sound
Broad coverage beats corner treatment when dealing with tiny spaces. Covering key areas with absorption panels, blankets, or foam reduces echoes and makes your voice sound warmer and clearer. For tips on effective wall coverage, see wall and surface treatment.
For example, hanging blankets or acoustic panels on walls, ceiling, and even the door can absorb 60-70% of reflections. Use thick, dense blankets or panels at reflection points—like behind your mic and across the ceiling.
Sealing gaps around the door is also vital. A simple DIY fix is hanging a heavy blanket over the door or sealing cracks with weatherstripping. These small tweaks drastically cut sound leaks. The tradeoff involves balancing accessibility with effective soundproofing; too many sealed gaps can make your space feel cramped or hard to access, but properly sealing key leaks ensures ambient noise doesn’t bleed in or out, maintaining a controlled recording environment.
Corner Bass Traps vs. Whole-Wall Coverage: Which Do You Need?
In a tiny closet, you might think bass traps are unnecessary. But low frequencies tend to build up in corners, causing muddiness in recordings. Proper bass trapping can improve clarity. Learn more about corner bass traps versus full wall coverage.
Compare this table:
| Feature | Corner Bass Traps | Full Wall Coverage |
|---|---|---|
| Best for low frequencies | Yes, very effective | |
| Coverage area | Limited, focused on corners | |
| Cost | Cheaper, DIY options available | |
| Ideal for small spaces | Better in larger rooms; in closets, full coverage often better |
In a closet, covering walls with acoustic panels or blankets reduces reflection more evenly than just focusing on corners. While corner traps are effective at controlling low-end buildup, they don't address mid and high frequencies as comprehensively. Full wall coverage offers a more balanced acoustic environment, especially in small, reflective spaces, helping your voice sound more natural and less boxy. The decision hinges on your specific needs, budget, and whether you want a quick fix or a more thorough treatment.
DIY Budget-Friendly Tips for a Closet Vocal Booth
You don’t need expensive gear to improve your closet sound. Use what you have—blankets, pillows, and foam panels from online DIY stores. Hang blankets with grommets or tape to the walls, leaving small gaps for air flow.
For example, layering blankets at reflection points and sealing gaps with weatherstripping can cut echo drastically. Use foam panels on the ceiling and at key reflection points for extra clarity. Remember, the goal is to create a balanced environment where sound is absorbed evenly, not just to block all sound with dense materials. Over-treating can make your space sound unnatural or dead, so focus on broad coverage and strategic placement.
Invest in a good microphone and position it properly. A decent mic and a simple stand make a huge difference.
Common Mistakes That Ruin Your Closet Setup
Over-treating corners while ignoring the overall space. Remember, broad coverage beats just focusing on edges.
Sealing the closet completely without ventilation. Heat kills electronics and ruins your comfort.
Placing the mic too close to reflective surfaces. Keep it in the 'sweet spot' to avoid muddy recordings.
Ignoring the door gaps and leaks. Seal them with blankets or weatherstripping to prevent sound from escaping or entering.
Failing to consider ventilation can lead to overheating, which not only damages equipment but also causes noise from fans and thermal shutdowns. Proper airflow management is essential to maintain a safe, quiet, and effective recording environment. Avoid the trap of sealing everything tight without planning for heat dissipation, as this can lead to equipment failure or degraded sound quality due to thermal noise.
Frequently Asked Questions
Can I really get professional sound in a closet setup?
Yes, if you treat the space properly. Focus on broad absorption, strategic mic placement, and sealing gaps. While it won’t match a professional studio, a well-treated closet can produce remarkably clear recordings for voice-over, streaming, or podcasts.
Where should I position my microphone for best results?
Place the mic about 6-12 inches from your mouth, slightly above or in front, avoiding walls or reflective surfaces behind or beside it. Use a stand or boom arm to keep it steady and eliminate vibrations.
Do I need bass traps in a tiny closet?
In very small spaces, low-frequency buildup is less of an issue, but adding bass traps in corners can still improve clarity. Focus on broad coverage first, then consider bass trapping if muddiness persists.
What’s better for a closet: foam panels, blankets, or all of the above?
All help, but broad coverage with blankets and panels is more effective than foam alone. Use blankets for sealing gaps and absorbing reflections, and foam panels for targeted reflection points.
How do I stop sound leaks through the door?
Seal gaps with weatherstripping or hang a heavy blanket over the door. For better results, add a door seal kit or acoustic curtain to block sound from escaping or entering.
Conclusion
Turning a closet into a recording space isn’t about spending a fortune on foam or soundproofing. It’s about smart placement, broad coverage, and good airflow. When you treat the space as a whole, your voice sounds clearer, and the noise stays where it belongs—out of your way.
Imagine a tiny closet filled with blankets and panels, humming softly with a well-placed mic capturing your voice in crisp detail. That’s the power of good planning—transforming small spaces into big results.